Showing posts with label gaming. Show all posts

Cooler Master MasterLiquid Pro 280 Review


Cooler Master, a name that is almost synonymous to cooling solutions for PC hardware today. The brand has a lineup of some of the best air coolers like the budget friendly Hyper 212X to the extravagant V8 GTS. Lately they were missing the needed spark in the AIO market which they plan to introduce in form of their latest AIO cooler series of MasterLiquid Pro CPU liquid coolers.

Thanks to Cooler Master India today we have with us the Cooler Master MasterLiquid Pro 280 cooler for review.


Being the biggest cooler of its series with a 280mm radiator the Masterliquid Pro 280 is equipped with a new FlowOp technology, two 140mm MasterFan Pro fans, an entirely new radiator and pump design along with some minor tweaks to make it a revolutionary new cooler, hopefully.

Backed up by a massive five years warranty its priced in at $100 or Rs 10,000 in India making it one of the more humbly priced 280mm AIO units out there but is it worth your money? Let's find that out.


What's in the Box?


Cooler Master has changed the packing game entirely with the new MasterLiquid Pro. The color scheme of the box is now black with hues of white and blue going in hand with their entire lineup of  'Maker Theme' products. Its a thick and compact cardboard box with a sleek vertical packing style rather than the horizontal one that we accustomed to. Products name and FlowOp technology are clearly mentioned for you to read along with a rendered image of the cooler in the backdrop.


At the back the box is simple and has a description of the technology used in the MasterLiquid Pro and how it differentiates it from the rest of the AIOs in the market. A neat block diagram of the pump and radiator are also printed at the bottom right with dimensional measures.


Open it and you'll find the entire unit resting securely in a hard cardboard frame which is fragmented to contain and protect each part individually.

Now we have with us the MasterLiquid Pro 280 AIO unit, two 140mm MasterFan Pro fans and a box that contains all the needed extras.


In the box, you’ll find a large rubber gasket, Y-split fan cables, pump power cable, Intel and AMD brackets, a universal back plate, user manual and installation guide along with a nice package with all the appropriate screws and fittings. There’s also a small tube of thermal paste, so you are good to go for a couple of remounts.

What lacks is a AM4 bracket for the latest AMD Ryzen CPUs which you can luckily get pretty soon from Cooler Master themselves once they start the roll out procedures for the same.
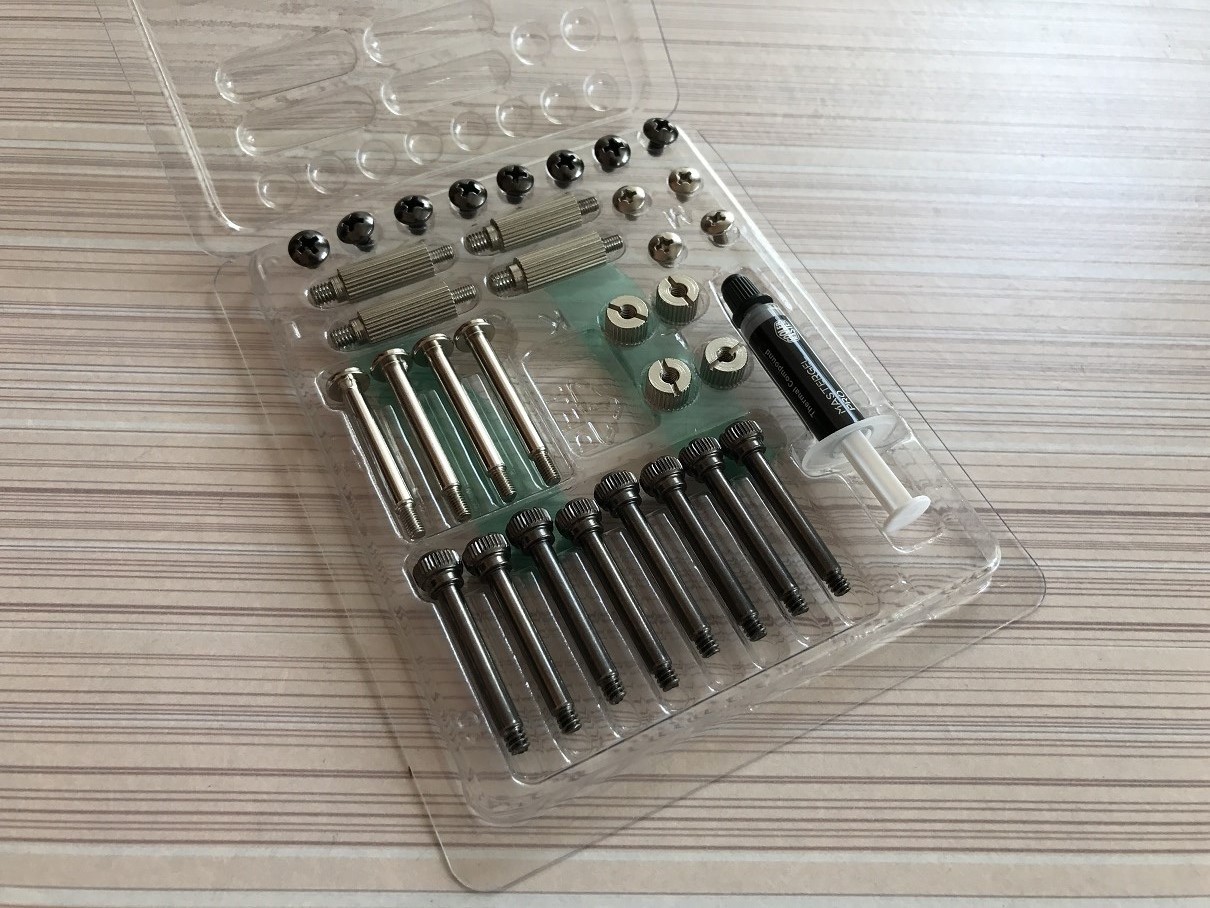


Before I move forward I would like to take a moment here to talk a bit more about the way Cooler Master has packed the various fittings for this cooler. The fittings are meticulously laid out in a case that give them a look of a mini tool box rather than the simple plastic bags that we are used to from other brands, not only does it look really neat but its also in coherence with Cooler Master's Make it Your motto. A very small and often unnoticeable packing trick but makes a huge difference to those who value details.


Let's take a Closer Look


Starting with the pump itself, this is a sleek but tall 55.9mm two chambered design from Cooler Master and is a part of their FlowOp technology. What it basically does is that it separates the hot coolant at the bottom half from the pump and other vital components at the upper half to ensure a better cooling and longer life span, sounds interesting to me!

Also the top of the pump is illuminated by a blue LED which is quite bright and looks catchy seated inside a system. Sadly you can't turn it off or change the color which might be an issue for a few but won't be any problem for people like me who value subtle illumination.


The 311mm x 138mm x 27mm radiator is oddly boxy with square fins that make it look even more boxy so its literally an aluminum block! The build quality on this thing is as solid as it gets with nothing to complaint about. I love the fact that not only can you mount two 140mm fans or maybe four if you are planning a push pull configuration but also two 120mm fans or four for that matter are also possible due to the mounting holes present for the same aswell. I'm not sure how this feature would benefit many but it should come handy if any of the motherboard or chassis projections are conflicting with the 140mm fans so a smaller 120mm can be used to save the day.


With a 360mm long and 8mm thick FEB tubing this is a one of a kind unit over here since mostly we see rubber tubes on other coolers. Best part is that they are braided with a mesh like material which also is there on all the fan and pump wires rather than a fabric material which tends to get dirty or wear off with time. Of course there is that CM signature coolant draining/replacing hose present on the rad for future repairs or DIY.


The fans over here are a pair of Cooler Master MasterFan Pro 140 Air Pressure edition with an RPM range of 650-2,800rpm. These are rated at 46.2-82.2cfm with 20-36dBA. Not only these fans are fairly decent in terms of performance but also have braided cable and rubber mounts to minimize the noise levels to the maximum.

On board is a tiny three-position switch on the hub that caps the maximum speed allowing to change between the three modes namely as Silent, Quiet and Performance. It all sounds good but the issue is that this switch is inaccessible if you install it in the prescribed position where it pushes air through the radiator. So to control the speed one has to rely upon the PWM controls of the motherboard or a dedicated fan controller in some cases.


Time for the fun part - Installation


Over here I'm using the Gigabyte Z270X Designare motherboard which is an Intel platform so will be showing you what all you need for the Intel installation process but in case you are using AMD platforms then you just need to replace the pump brackets as other would remain the same.

Also the stand offs are only required for LGA 2011-3 sockets others don't need them at all.


Mounting the universal backplate is fairly easy and I suggest you put the screws and holding clips in the bracket before you put it on the motherboard to avoid any difficulties. Make sure read the manual properly before proceeding.

Put the rubber gasket on top of the radiator and then screw in the fans with the Cooler Master logo facing the radiator to put it in a push configuration.


Mount the mounting brackets on the pump and then screw it down with the thumb screws on top of the processor obviously after applying some thermal paste on the CPU.

The installation process is not the easiest one I've come across so far but it isn't that difficult or clumsy aswel like I've come across on some other brands. I did feel that instead of making the backplate so complex to prepare before mounting Cooler Master could've opted for something like the mechanism that Corsair has on their AIO's backplate. People new to AIO cooling would take some time to mount it properly but fortunately the manual is fairly detailed and easy to understand. One more thing that I found was that its difficult to get that loose rubber gasket in place while matching the correct holes but it would be worth the effort if it does damp down the vibrations.


Let's put it to Test!


For testing the performance of the  Cooler Master MasterLiquid 280 Pro we'll be using the following test bench.


CPU: Intel Core i7 7700K

Motherboard: Gigabyte Z270X Designare

RAM: Kingston HyperX Predator 8GB DDR4 3000Mhz

Cooler: Cooler Master MasterLiquid Pro 280

Graphics Card: Gigabyte GTX 1050 Ti G1 Gaming 4GB OC

Storage: ADATA XPG SX950 240GB SSD

Power Supply: Cooler Master MasterWatt Lite 700

OS: Windows 10 Pro 64-bit


Firstly, the CPU is kept at stock speeds with boost enabled and temperatures are measured both at idle and at full load. Then we overclock our Intel i7 7700K to 4.8Ghz at 1.35v which by now everyone knows is a frequency where this chip tends to get real hot at, the same process as that for the stock speed testing is repeated. Temperature is measured using HW monitor with an average being taken of the temperatures recorded on all four cores. MSI Kombuster utility is what I prefer to stress test the CPU at all eight threads, I run it for a good 15 minutes before recording the temperatures since by then the temperatures reach a saturation point.

Secondly, the pump is plugged directly into the CPU Fan header while the fans on the other fan headers of the motherboard. Fan profile was kept at default from the BIOS itself to rule out any discrepancy whatsoever.

The readings would be shown in delta temperature that is after subtracting the ambient temperature of the room while noise levels are recorded from a distance of three feet from the cooler which is a reasonable and practical distance for such tests.


Temperature wise we can see that the Cooler Master MasterLiquid Pro 280 does a decent job for a 280mm AIO cooler both at stock and overclocked frequencies. Considering my ambient temperature is high and the fan profiles are set to default I'm sure if you set the fan speeds to full or to performance in a cooler environment the results would be even better.


The cooler is a bit noisy I'd say when the system is under full load but at idle state the units is barely audible. The noise produced by the MasterLiquid Pro 280 is almost identical to that of the Corsair H100i GTX even though the unit is bigger in size this is mainly because of the large amount of rubberized damping material used on the fans and the gasket on the radiator so I'm happy to see that the extra effort with the gasket paid off.


My Verdict


I've not been a fan of Cooler Master AIO coolers for one reason or the other but that was till I got my hands on the MasterLiquid Pro 280! Cooler Master has almost made everything perfect about this cooler with only a few minor cons which are easily outweighed by the pros that it has to offer.


The radiator, pump and tubing is all solid in build and look elegant from every possible corner with no unnecessary RGB nonsense! Cooling performance at silent mode is really good for a cooler of this category, nothing revolutionary though, with leaving enough room for users to turn the knob up to maximum speed to cool their systems down further on. I loved the rubber gasket as it indeed reduces vibrations even though it poses a little issue during installations but its worth it for what it offers in return. The blue LED is subtle and bright enough to impart a sense of style to the cooler but I would've loved to be able to see the coolant flowing through the transparent glass, something that I would advice Cooler Master to try introducing in future.

All in all the Cooler Master MasterLiquid Pro 280 is a step in the right direction and would appeal to enthusiasts and gamers alike with enough elegance to woo in some modders aswell who want something different from the usual and boring AIOs.

I give it a 8/10 earning our Gold Award!


GIGABYTE X99 SOC Champion 6950X Broadwell-E OC Guide


Wednesday, June 1, 2016


GIGABYTE X99 SOC Champion 6950X Broadwell-E Overclocking Guide 


GIGABYTE X99 SOC Champion OC Guide (Broadwell E Update)
by dinos22 & sofos1990


1. SINGLE BIOS mode: make sure you turn it ON (position 2). This switch will disable Dual bios mode in case it triggers a bios switch or update due to OC fail.


2. This CPU_Mode switch is ONLY required for 5960X (Haswell-E) and it is not required for Broadwell-E (6950X). We suggest that you leave it in DEFAULT position (position 1)


3. POWER DRAW: Our testing has shown that Broadwell-E draws less power than Haswell-E, despite the fact it has a higher amount of cores. This is welcome news as some PSUs were having problems with OCP shutdown as power draw exceeded the Amp draw limit on 12V rail. This may still be happening on PSUs of lesser quality or with aggressive OCP spec. We recommend discussing with peers what PSUs to use for extreme OC.

4. CB (Cold Bug) & CBB (Cold Boot Bug) changes: From our experience testing 6950X CPUs, we've seen very similar behaviour with CB and CBB overall. CB is generally between -95C and -110C. CBB is more CPU specific and can sometimes be same as CB but mostly ranges around -90C.

Some tips: Find your CB and CBB first and test it a few times. Once you have a rough idea, it will make it a lot smoother to bench your CPU. Here are some post LED codes to watch out for:


  • Post Code "bF": When you restart and you see post code "bF", switch off PSU and let all power drain from board before switching PSU back on, start again. Most times it will boot straight back up and you are ready to go. However, you may see post code 91!


  • Post Code "91": Switch PSU off if you see this post code, let power drain from board (you will see power LED light turn off on board so there is no residual power in the board), switch PSU back on and hit start and go. Sometimes you may need to go warmer than your regular CBB (i.e from -90C to -80C) to avoid post code 91.


  • Post Code "BLANK": This is generally CBB (no post code showing at all). Just turn off PSU, warm up below CBB temp (try -80C) and turn on.


This is simply a guide and may not be the case with your CPU so it is advisable to test the limits of your chips specifically.

5. Voltage Changes, Limits and Frequencies: We are going to talk about 4 categories, core voltage, uncore voltage, memory voltage and voltage limits


  • Core Voltage: Air cooling 4GHz, you are looking at around 1.2vcore. We tested up to 1.35vcore with benchmarks such as XTU and found CPUs were mainly running below throttling temperature and frequency of up to 4.4GHz.


LN2 cooling we find that it's best to start with 1.5v at -60C and go colder. Most CPUs will like 1.55vcore with -80 to -110C. Some chips will scale higher with 1.6v-1.7v but majority we tested stop scaling up to 1.6vcore. Majority of CPUs did 5GHz, great CPUs did 5.2GHz and special chips will go beyond 5.3GHz with Cinebench R15. This may change with new retail batches.

VRIN is another voltage you need to use (up to 2V on air and generally 2.2v LN2). 2.6v can kill CPUs so be careful.

PLL TRIM is the last one to look out for. Use +15. Improves OC performance and stability.


LLC (load line calibration), set to Extreme (refer to screenshot below for full settings).


  • Uncore Voltage: This voltage has changed compared to Haswell-E. There are two voltages that affect uncore/cache frequency. One is "VRING" and other is "VccU Offset".


Air testing showed that uncore will scale to 3.75GHz roughly using up to 1.40VRING and +0.25 VccU Offset. You don't really need high VccU offset for air or LN2, +0.25 is generally enough for majority of CPUs.

LN2 testing showed that uncore will scale to 4.6GHz roughly using a mix of voltage and correct temperature. In terms of voltage, we could see uncore scaling up to 1.6VRING and we use +0.25 VccU Offset. You can try higher voltages and see if it helps with your CPU. Temperature is very important with uncore. You must be cold enough to boot at very high uncore clocks (-80C or colder). We recommend booting at lower uncore and using GTL to clock up core and uncore frequency in OS.

Post Code tips: If you see the post code looping after restart and board suddenly shuts down, that usually means the uncore is too high for that boot which will either need colder temp or bios reset and reloading profile. You may see postcodes such as "b0", "bF", "b2" but it might be others as well.


  • Memory Voltage: We will specifically refer to B-die based memory ICs here as they have shown to be best for extreme OC. There are two different volts (VSA & memory volts) you need to use to clock memory well as well as memory voltage training.


VSA voltage is generally recommended in +0.25 to +0.35v.


  • Memory voltage we generally use 1.6v for 3000MHz 12-12-12-28. For 3400MHz and higher, we use 1.7-1.75v. CPU must be cold (use -80C or higher).


  • Voltage Limits: CPUs did not really scale past 1.7vcore. Uncore voltage did not really scale past 1.6v on most CPUs. Memory voltage we suggest keeping below 1.8.  Offset voltage and VSA are not needed any higher than previously shown. These are extreme limits and you must find out what your CPU and memory like. If you use too high a volts, you will probably lose max MHz frequency. Best to find the ideal volts for your hardware! 


6. Post Code LED tips: Please check point 4. & 5. for some tips. We will also provide some additional info for various memory related post code troubleshooting below:


  • Post Code "61": Overtightening CPU pot can cause this post code. This can also be pure memory frequency or vdimm limitation. If a RAM slot is wet, it can also show 61.


  • Post Code "50":  System not detecting memory correctly due to dirt in dimm slot or not inserted properly. Tight timings limitation can also show this code.


  • Post Code "91": Uncore too high, CPU too cold


  • Post Code "8A": 1T unstable, too high VTT termination volts, RTL incorrect


  • Post Code "bF": memory wet


7. CPU temperature, paste, correct mount and stability: Make sure you have a stable mount when you are overclocking. You will find that once you start to push high frequency and volts that your paste may not work correctly and can become unstable and previously stable frequency. Best way to OC is to use a staggered approach where you start with 4.5GHz profile, 4.8, 5 , 5.2 with specific volts and temp ranges. If you crash at any stage, you probably "lost your mount". Essentially your paste snapped and is not conducting heat properly between CPU HS and CPU pot. One way you can detect this is via a delta probe (keep one temperature probe on HS and second on CPU pot). Quick way to fix this is to turn off system and cool down to -25C and then quickly bring back temps down to cold and start. 90% if the time, you will be able to clock high again but may not be able to get max clocks until full paste remount (full CPU pot warm up, paste replacement etc) 


  • B-die memory screenshots    


9. GIGABYTE Tweak Launcher (GTL):


Download link: https://www.dropbox.com/s/nilp1r52k5u0xsx/GTL%202.1%20B16.0527.1.zip?dl=0


10. BIOS: You don’t need a special bios for extreme overclocking. Download the latest bios from here
http://www.gigabyte.us/products/product-page.aspx?pid=5280#bios


Haswell-E (5960X, 5930K, 5820K) OC Guide

11. Voltages for Uncore (make sure CPU_Mode switch is turned to ENABLE (position 2)
In the CPU Advanced Voltages  when you have switched to the OC mode you will see some extra voltages. VL1 to VL6.

You only have to change VL4, VL5 and VL6 as below.


 The voltage you have to change to get higher uncore is mostly the VL6. Almost all the CPUs can do 1.45V, most of the CPUs can do 1.5V but some CPUs can do even higher Voltage. There are few CPUs that boot with lower than 1.45V though. If the CPU can do high VL6 then probably it can do and high Uncore but not all the times. It depends on the CPU. In the OS through GTL all you have to do is to raise the VRING to 1.45V-1.5V in able to get high Uncore.
12. RTLs.
You can change the RTLs but not manually only changing the IOLs manually.
IOLs to 1 will bring the RTLs all the way down to what the board is capable of until now.
You need to change the IOLs at every channel. Set the option at manual mode and change the  primary and secondary timings only for channel A and then change the IOLs to each channel manually.


13. Use both 8pin and 4pin cables for CPU Power otherwise with heavy load the system maybe will be shutting down.

14. You don’t need extremely high VSA and VDIMM. VSA between +0.25-0.35V should be enough to drive the mems high. +0.25-+0.3V should max your mems on most cases. VDIMM 1.55-1.65V is ok. I was able to do even C11 with 1.6V.


15. Few times you will see codes like 72, 74, 50, 51, 60, 8A. Try to press the reset button few times. There’re times that doing it it passes the training. Especially when you change the RTLs and you get 8A try it for sure. It doesn’t happen on latest bios so often.
https://www.dropbox.com/s/g46ggra2mtkvv4z/F4f.rar?dl=0


16. X99 MemTweak, GTL
https://www.dropbox.com/s/546fstudskrtpb8/GTL%202.1%20B15.0129.1.rar?dl=0
https://www.dropbox.com/s/op86rsq2ikubgcl/MemoryTweak-X99%20B14.1218.1.rar?dl=0

Highest bootable VL6 cannot be overridden through software. Same value that your CPU won’t boot from bios if you set it through software it will shut down.


17. Please be careful! The VLs can affect your CPU cold bug so make sure that when you change you don’t hit the cold bug earlier than before. If you have this problem try higher or lower VL3 (usually higher helps). If VL3 doesn’t fix your problem then try the same for VL6.
Also, different bclk affects the cold bug too, so try this as well. Almost all the CPUs are ok with 127.5 bclk and PCI3.

18. Make sure that you’re using proper insulation around the memories area and also put some paper towel around the PCH cooler. The way that worked best for us was a layer of plastidip, then a layer of Vaseline and  paper towel.

19. Always save a profile before you save and exit cause most of the times the only way to go back is the CMOS button.

20. For memory voltage we used up to 1.9V on single sided dimms on LN2 without a problem. But it doesn’t mean that all the dimms can handle it so be careful in case you don’t want to degrade or kill your memories. Dino was benching with 1.8V without any issue.

Originally posted by Gigabyte Tech Daily


Gigabyte Z270X Designare Review


The Kaby Lake CPUs from Intel are out, aimed at main stream consumer bracket these chips are the successor of the 'now' previous gen Sky Lake which happened to have been a very successful SKU for Intel last year! Though not an entirely new processor the Kaby Lake is a slight improvement over Sky Lake offering more performance per watt and this time scratching the overclocker's back with enormous overclocking potential right out of the box.

As new processor means new motherboards this story is no different. Kaby Lake brought in the Z270 PCH motherboards and today thanks to Gigabyte India we have with us their latest and most distinguished motherboard, the Gigabyte Z270X Designare for review. The Z270X Designare is aimed to impress graphic designers, people into 3D rendering, content producers and almost everyone else who's into such professions hence its the only motherboard in the sub $200 price point to officially offer Quadro cards!


One of the biggest upgrades in the Z270 motherboards is not only the
support for Intel's Optane Memory but also the fact that the PCH has 24
PCIe Gen3 Lanes to allocate to various I/O ports, SATA ports or even USB
3.1 ports making it a more connectivity rich motherboard especially for
those who rely on such options a bit more.  Priced in at $184 this is a budget motherboard with every feature one should expect from a Z270 PCH motherboard along with all the Gigabyte exclusive features such as RGB Fusion, Smart Fan5 and much more.


Packing and Accessories


From the box itself you'll realize that its not just any other Gigabyte motherboard. Its slim silver box rather than the usual dark color schemes that we are used to from Gigabyte. A fade out image of the motherboard occupies most of the front along with the product name. Key features such as maximum memory frequency, USB Type-C etc are enlisted at the bottom while Gigabyte has also introduced their Designare 'logo' over here which you can find printed right above the product name! It eerily reminds me of the Animus from Assasin's Creed video game series!


The back unlike the front is printed to the brim with features! It has a similar layout like the previous boards with exclusive new features taking center stage such as the RGB Fusion and Smart Fan 5. All in all the packing is impressive and I kind of like this new shiny layer on the box.

Open the box and you'll find the motherboard in an anti-static bag resting on top of the bottom compartment that houses all the accessories.


Gigabyte has kept the accessories package to a bare minimum probably in an attempt to cut costs. The package includes User's manual, Installation pamphlet, 4x SATA cables, Rear I/O shield, front panel connector block or the G-connector and a Gigabyte Gaming decal is also provided.

Sadly even though the Designare aims to impress content creators and people in allied professions it lacks a basic accessory of a SLI bridge which might not be of much use to the general consumer or gamer but is useful for designers who tend to use multi GPU setup including Quadro cards!


Closer Look and Features 


When I first looked at the Z270X Designare I found it downright impressive! Its the only Gigabyte motherboard on the shelf today or ever to feature an all new white PCB and color scheme instead of the black, green, red and even yellow that we are used to from almost all the manufacturers today!


The motherboard is neither too beefy or over loaded with plastic nor is it a barren naked PCB with a bunch of heatsinks here and there. With the Z270X Designare Gigabyte has hit the perfect balance of in terms of aesthetics. Everything see to be in perfect harmony and it won't be wrong if I quote that this is one of the most elegant motherboards in the market today!


Surprise! Even the back has a Designare branding, wonder who'll notice that though, but a little marking doesn't hurt and shows Gigabyte's dedication towards designing am impressive product from every corner or the backside to be precise!


Gigabyte is so determined I'd say to establish Designare as a brand on its own that they've put the Designare logo on the Z270 PCH Heatsink which is where every brand tends to stick their own company logo rather than a product logo! Also the entire design of the heatsink is different with an aluminum block drifted in two from between by a grating which is quite neat and looks quite interesting.


Looking at the CPU area we can see the LGA 1151 socket resting in a remarkably clean area. This is the same socket that you can find on the Sky Lake compatible motherboards hence if you want to use a Kaby Lake CPU on your Z170/H170 motherboard then it might be a possibility after a BIOS upgrade.


The CPU area clearance on the motherboard is nothing exceptional though and is enough for installing 'conventional' cooling solutions like AIO or air coolers but if you plan to use something like the Noctua NH-D15 or like in my case the NH-D14 you'll be compromising on one DIMM slot giving you just three available or best two for an ideal dual channel configuration. Its a common scenario with such beefy air coolers but I thought it would be wise to mention it here since I had the cooler at my disposal.


DIMM slots are LED illuminated and reinforced by metal shields to not only work as an EMI shielding to the RAM sticks to ensure hindrance free performance but also to impart tensile strength to the slots in case one uses tall or heavy Memory kits like my Kingston HyperX Predator.

These support a maximum of 64GB DDR4 memory kit working at a maximum frequency of 3866Mhz. Also the mounting mechanism is changed and both the locking brackets need to be opened prior to DRAM installation.


The I/O panel is scantly populated with a PS/2 keyboard-mouse port, six USB 3.0/2.0 ports, one USB Type-C port, one USB 3.1 Type A port (red), one optical S/PDIF out connector, one gold plated HDMI port, one RJ-45 ports and 5x HD audio jack. I kind of miss the presence of a few more USB ports since we already have just one PS/2 port for keyboard/mouse.

I feel that the I/O panel is scantly populated for the price the motherboard comes for like a dual LAN port should've been there to support LAN teaming. Yes I understand that its not a gamer specific product but even in designing studios systems are connected to each other for load sharing & a dual LAN would've made the data transfer easier and faster.


Turn your gaze towards the PCIe area and we see three PCIe 3.0x16 slots and three PCIex1 slots for devices of a bygone era! One M.2 slots is also provided that we'll discuss later on.

All three full sized PCIe slots are armored to support large and heavy graphics card. If you are using a Kaby Lake or Sky Lake CPU then the configuration would be as follows for SLI configurations:

Single Card: 16x/0/0/

Dual SLI: 8x/8x/0/

Tri SLI: 8x/8x/4x/

Now for the noteworthy points, the first and second full length PCIe slots receive their share of 16xPCIe lanes from the CPU whereas the bottom PCIe slot is fed with 4x PCIe lanes from the Z270 PCH which in turn it shares with the U.2 port!

So ideally the Z270X Designare is meant to be used in a dual GPU configuration with dual NVMe SSDs at max.


Coming over to the M.2 port, it has a accomodation capacity of 110mm drives and supports PCIex4 Gen 3.0 NVMe drives aswel as a SATA drive. Both the M.2 NVMe SSD and the U.2 SSD can be used simultaneously in RAID 0 setup since they draw their PCIe lanes from the PCH directly and not from the CPU or even share them with eachother.


The standard 6Gb/s SATA storage ports are six in numbers along with two dedicated SATA Express ports. All six ports are RAID compatible with eachother and with the M.2 port aswell. A dedicated U.2 port is also provided & is a carry on from previous designs. To save the cost of an additional SATA 6Gb/s chipset Gigabyte has chosen to disable the bottom right SATA port if a M.2 SATA SSD is used in the M.2 port so the maximum number of SATA drives supported by the motherboard simultaneously is six in number. Also I'm happy to see that two of the six SATA ports are perpendicular in nature for easy installation and wire management inside a chassis.


On the left side of the board we have the AMP UP audio technology powered by a Realtek ALC 1220 5-channel CODEC which is an upgrade to the ALC 1150 used previously by most of the manufacturers and is protected by an LED illuminated isolation strip to prevent any static distortion. This arrangement is solidified with gold plated Chemi-con capacitors and three Texas Instruments  OP1652 op-amps to power headphones and provide a surround sound experience.


Keeping the increasing demand and availability of USB 3.1 ports on the chassis Gigabyte has even equipped the Designare with an onboard front USB 3.1 port. Its a welcome move since more and more devices are becoming USB 3.1 compliant making it easy for the users to access the much needed technology from the comfort of his chair.


Z270X Designare doesn't come with a debug LED display but there are four LEDs at the bottom right corner that blink to indicate if there is anything wrong with a particular component to atleast give you a hint of what the problem maybe. These LEDs are namely as CPU, DRAM, VGA and Boot.

I did try them out or atleast the DRAM, CPU and Boot functions and found them to be working just fine which is a really good indication since these four are the common areas for boot failures aiding in easy diagnosis and solutions.


The Gigabyte Z270X Designare is powered by a 7+1 phase all digital power delivery system. At first it may sound a bit too less or under powering but this arrangement is more than enough to power and overclock a Sky Lake or Kaby Lake CPU even under high loads, I'll show it to you in the benchmark section.


Intersil’s ISL95866 chip which is a hybrid digital PWM controller is implemented to control the power delivery system. For the MOSFETs Gigabyte parted ways with the usual International Rectifiers PowIRstage solutions and opted for the Vishay PowerPAK SiRA12DP and SiRA18DP N-channel MOSFETs for the CPU and Memory power delivery system.


IT8686E which is the first embedded controller (EC) we find on this board, its purpose is to expand OC features and fan control.


An Intel i©14 EAR48U82 chip is responsible for the LAN functions on the Gigabyte Z270X Designare.


The motherboard is equipped with two ASmedia ASM2142 chips to control the USB 3.1 Gen 2 controls. One is located near the front USB 3.1 header while the other one is located just behind the I/O panel to provide more efficiency to both the port(s)


BIOS and Bundles Software 


BIOS Overview 


The BIOS for the Gigabyte Z270X Designare looks similar to that of the other new generation boards from Gigabyte with a red and black layout. I was hoping for a completely revamped BIOS over here atleast in terms of color scheme preferably white with shades of grey due to obvious reasons, the layout could've been the same since its quite neat and well planned.

Gigabyte has parted ways from its older BIOS styling that we are accustomed to bringing in a more balanced approach towards styling and functionality without any hassles or distractions.

The BIOS theme looks like a space ship HUD coated in blood red color scheme. The labels and tabs in the Classic mode are the same as the previous generation so users won't face any problem in finding their favorite settings.


Pressing the left Alt key brings up a small menus from the bottom giving you quick options like to switch to the Easy Mode, Change the language, Q-Flash and Smart Fan. Whereas the right Alt key brings a slider menu from the right side of the screen giving you vital information about the CPU/Memory frequency, Core voltage and temperature.


Smart Fan is well laid out and gives full control over fan behavior and AIO pumps. You can even set a custom RPM to Temperature graph!


Q-Flash is for BIOS flashing and backup, I personally love the graphical approach that Gigabyte took even for such a small yet important function.


Last is the Easy Mode layout which gives a comprehensive layout of the common settings such as fan speed, energy options, XMP profile etc.


Bundled Software


Gigabyte App Center is what they've been rolling out since a long time with their boards and nothing much has changed in that with time but with the X99 v2 and Intel 200 PCH motherboards they did bring a welcome change from which the Z270X Designare has also benefited.

The main screen is now a proper window and not a pop up scroll bar from the bottom right of your screen. Three different tabs make it a one stop place since you get Gigabyte Apps in one and the entire Window's Control Center in another tab. A Third Party Software tab is also there though it only recognizes a few and in my case only the Intel XTU suite was recognized.

Again my only complaint is the color scheme and nothing else.


Rest of the Apps look the same as previous with a few tits and bits of changes. But as long as they are functional/helpful I'm Okay with it and fortunately they all work just fine in my case.


The RGB Fusion App in the App center allows you to take full control over the motherboard's LEDs that are embedded throughout the surface. You can either turn them ON/OFF or set them to operate in a pre-defined manner. One change from the previous boards is that you can choose colors for each corner of the motherboard which is quite funky at times.


Benchmarks and Overclocking 


Putting all the components together and booting up into Windows was a breeze with the Gigabyte Z270X Designare. Everything worked properly and installed properly without any issue. The motherboard looks elegant and all black when off or when the LEDs are turned down ensuring no hindrance with the glow and appearance of the motherboard LEDs whatsoever.

For the benchmarks we used the following test setup configuration --


CPU: Intel Core i7 7700K 4.2Ghz

Motherboard: Gigabyte Z270X Designare

RAM: Kingston HyperX Predator 8GB DDR4 3000Mhz Memory Kit

Cooler: Corsair H100i GTX (Push Pull Configuration)

Graphics Card: Gigabyte GTX 1050 Ti G1 Gaming 4GB OC

Storage: Corsair Neutron GTX 480GB SSD

Secondary Storage: Kingston A400 240GB SSD

Power Supply: Corsair AX860i 860W 80+ Platinum

OS: Windows 8.1 Pro 64-bit

GPU Driver: ForceWare 375.70


Though not being a fan of RGB I'm impressed by the implementation of the same on the Designare since the lights are well diffused and placed nicely at places where they should be and are most importantly visible. The color combination and lights compliment eachother with white being my favorite color.


The Intel i7 7700K comes with 4.2Ghz and 4.5Ghz boost. The system was stable on stock setting so we started our overclocking journey with this Kaby Lake offering and reached a stable 5.1Ghz with  just 1.4v while the memory hit perfectly on both its XMP profiles of 2666Mhz CL14 and 3000Mhz CL15. Take note that the Kaby Lake chips tend to run hot and we did hit near 100°C near peak loads at this frequency even with 20°C ambient temperature!


So we clocked down to 4.8Ghz to keep the CPU within safe temperature marks. Hence, all our benchmarks would show the CPU at 4.8Ghz with memory at 3000Mhz CL15.


Since I have used the same memory and CPU at the same frequencies as mentioned above for the Gigabyte Z270X Designare, Aorus Z270X gaming 7 and the Aorus Z270X gaming 9 we'll be pitting these three against eachother to see how well the Designare fairs out to its closest competition the Gaming 7 in specific!


AIDA64 Cache & Memory Benchmark


AIDA64 Extreme Edition is a great tool to bench your CPU and RAM in terms of their read-write-copy abilities. Its clear from the graph that the Designare has superior memory performance over both the Z270X Gaming 7 and the Z270X Gaming 9 leaving behind much more bigger and expensive boards.


AIDA64 GPGPU


The reason for including this benchmark was to simply observe the AES and Hash Test which is a determent of how easily your CPU or GPU can crunch complex calculations and higher score is always regarded better.

Again we can see that the Z270X Designare is racing past the Z270X Gaming 7 but loses to the top of the line Z270X Gaming 9.


7-zip


7zip is a compression and decompression program that utilizes the processing power of the CPU alone. It is a synthetic benchmark that gives results very close to real life scores.

As seen the Designare is able to pull more juice out of the CPU and hence delivers better results than the Gaming 7 even though it loses to the Gaming 9.


Intel XTU


The Intel XTU utility not only helps one to overclock and test the system stability all in one place but also can be used to benchmark the processor in terms of comparative score.

Its quite clear that in terms of CPU utilization the Designare is ahead of the Gaming 7 and only loses to the Gaming 9 which is understandable. Its a good indication since rendering and design works benefits tremendously from raw CPU power.


Cinebench R15 and Cinebench R11.5


Cinebench uses Maxon's Cinema 4D engine to render a photo-realistic scene of some shiny balls and weird things (we miss the motorbike). The scene is highly complex, with reflections, ambient occlusion and procedural shaders so it gives a CPU a tough workout.

As Cinema 4D is a real-world application - used on films such as Spider-Man and Star Wars - Cinebench can be viewed as a real-world benchmark.

Similar scores for the CPU are seen, while GPU utilization for graphical rendering is even better for the Designare when compared to the Gaming 7.


wPrime v2.10


wPrime is a leading multithreaded benchmark for x86 processors that tests your processor performance by calculating square roots with a recursive call of Newton’s method for estimating functions. Lower time is considered better over here.

Again its the same picture with the Gaming 9 leading the pack followed by the Designare and then the Gaming 7.


SuperPi Mod v1.5


SuperPi is a simple program that utilizes the processing power and memory speed of the system to calculate the value of Pi upto 1 Million or 32 Million decimal point depending upon what you choose. The time is calculated in minutes and seconds, we'll take them both in seconds, so lower the score faster is your computer.

I guess I'll spare writing anything over her and leave it to your own deliberation & understanding.


Unigine Heaven 4.0 and Unigine Valley 1.0


A compilation of 26 beautiful scenes rendered and run via the raw GPU power of the system. It emulates any game or graphical work that you'll perform on the system scoring it on various parameter. We ran the test on Custom preset and settings at 1920x1080 resolution, quality to ultra and extreme tessellation.


3DMark Fire Strike 


Fire Strike by 3D Mark is a test suit that plays a cinematic scene to determine the FPS, GPU temperature and CPU temperature scaling everything via a cumulative score. It is a great tool to benchmark your GPU since the render is GPU dependent.


Gaming Benchmarks


All the games we played were set to High preset, if mentioned otherwise, with God Rays enabled wherever applicable. These scores are using the DX11 API with the Gigabyte GTX 1050 Ti Gaming G1 card set to OCMode setting the clock speed to 1393Mhz and default fan profile.

The scores are near identical for all the three motherboards since gaming is not a test where you can push the hardware to its peak so mostly all premium segment products perform equally in this area if something is not gravely wrong somewhere.


CrystalDiskMark 5.0.2


CrystalDiskMark is a disk benchmark software that analyses different types of hard drive. Giving sequential benchmark write and read statistics in MB/s. A simple program that is very useful.

Over here we've used the Kingston A400 240GB SSD and its quite clear that the Gigabyte Z270X Disgnare is ahead of the Aorus Gaming 7 in terms of data transfer speed aswell. Even though its a synthetic benchmark but in real world scenario this difference would be evident when transferring large file especially raw graphic data meant for professional video and image editing.


My Verdict


For a long time Gigabyte had been rolling out the same kind of motherboards in terms of looks and aesthetics and to be honest it was too much of plastic at times aswell with an overload of LED but all that has changed with the Designare!

Gigabyte Z270X Designare is the thing in the right direction for Gigabyte both in terms of looks aswell as performance. The board is simplistic with a balanced layout and a white color that is bound to woo in most of the people out there. Plastic use is minimum and we can see a neat and clean PCB ready to be decorated by all the hardware one wants to put onto it much like a blank canvas for a designer to paint upon!


It does exceed and passes the bigger and more expensive Aorus Z270X Gaming 7 in almost every area making it the perfect choice for gamers and obviously designers who are not looking into too many high speed storage devices since that's an area where the Designare lacks with just one M.2 and one U.2 port whereas the Gaming 7 has two M.2 slots with any more SATA ports.

RGB LEDs are at its best and just in the right amount and color combination, they are more refined and diffused than the previous generation motherboards and go very well with the all white PCB underneath. Official support for Quadro cards is a cherry on the cake completing the deal and making it the best option at this price for content creators.

The Gigabyte Z270X Designare is highly recommended to gamers, modders, studio owners and obviously content creators who want the right balance of looks and raw performance at just the right price.

I give it a 8/10 earning our Gold Award!